This follows on immediately after installing Debian 12 and setting up Plasma with Wayland. I’d do this before installing FOSS on Debian.
1. Fix my Corsair K70 Keyboard for Missing Pipe Character
Luckily the keyboard options available during the install and setup process have got me this far. But I’ve got a missing | Pipe character, because the mapping of my keyboard doesn’t reflect my actual keyboard. I just chose the closest one during setup. Let’s put this right.
My keyboard: Corsair K70 LUX RGB

I draw your attention to the flat ENTER Key, above it is the pipe/backslash key. But currently that key maps to # (hash) ~ (tilda). And SHIFT+2 should be @ (at) but it maps to ” (double quote). This isn’t uncommon. But it is a problem, especially the lack of a pipe.
From the terminal we can see the current keyboard setup:
$ cat /etc/default/keyboard
# KEYBOARD CONFIGURATION FILE

# Consult the keyboard(5) manual page.

XKBMODEL="pc105"
XKBLAYOUT="gb"
XKBVARIANT=""
XKBOPTIONS=""

BACKSPACE="guess"
And we’ll see the same when we manage the keyboard in system settings. You’ll find the Keyboard settings here:
System Settings > Hardware > Input Devices > Keyboard

What is interesting is that via the terminal is lists the default as 105 keys but the GUI above shows 104 keys. How to find the right keyboard layout?

- Click on the “Layouts” tab
- Then click the “+ Add” button in the lower half of the window.
- Select a keyboard that you think might match your one and click the “Preview” button to see it.
- Once you’ve found the right keyboard click OK on Add Layout window and then Apply on the System Settings window.
IMPORTANT: The preview image always seems to have an “L” shaped Enter key and doesn’t show ANSI keyboard layouts which have a flat bar enter key. (As shown in the picture of my actual keyboard above).
If you have a Corsair K70 LUK RGB keyboard like mine then you’ll need to select “English (US)” for your keyboard layout. Ignore what the preview picture shows, it works and to prove it here’s a selection of characters which were previously unavailable or in the wrong place 😉
| \ @ ” $ #
2. Ensure my user can sudo
By default on Debian 12 the main user account you created when installing the distro does not belong to the sudo group. So when you try and run a command with sudo in the terminal you’ll get a warning like this:
bob@MACHINE:~$ sudo apt update
[sudo] password for bob:
bob is not in the sudoers file.
Luckily the install process also created a root user. In fact all Linux systems have a root user. So you need to become the root user to grant sudo permission to your user. I know it gets confusing, but just think about it as “which hat am I wearing?” or “Am I acting as a user or as root at this time. If you’re familiar with standard documentation then you’ll know that a # (hash) at the start of command line means “Done as root” whereas a $ (dollar) means “Done as user“. If you look at line 1 of the example above you’ll see a $ character before the sudo command.
Add the user to the sudo group
In this example bob is the username. Be sure to change it for your username.
bob@MACHINE:~$ su -
Password:
root@MACHINE:~# whoami
root
root@MACHINE:~# usermod -aG sudo bob
root@MACHINE:~#
logout
bob@MACHINE:~$ echo "log out of this session. Then log in to pick up the sodo group";
log out of this session. Then log in to pick up the sodo group
bob@MACHINE:~$ groups
bob cdrom floppy audio dip video plugdev users netdev bluetooth lpadmin scanner
What is explained above is that your user bob will not pick up the fact that they are now part of the sudo group until they log out of the current session and then log back in. It is not enough to just close the konsole and open another one. You need to log out.

Once you log back in from the greeting page (no need to reboot the server) you can open a terminal and run the ‘groups’ command and you should see sudo listed.

But that’s not all. The original warning mentioned the sudoers file. So let’s understand this a little better. This file configures who/how/what sudo can do.
bob@MACHINE:~$ sudo cat /etc/sudoers
#
# This file MUST be edited with the 'visudo' command as root.
#
# Please consider adding local content in /etc/sudoers.d/ instead of
# directly modifying this file.
#
# See the man page for details on how to write a sudoers file.
#
Defaults        env_reset
Defaults        mail_badpass

...
# Allow members of group sudo to execute any command
%sudo   ALL=(ALL:ALL) ALL
I’ve …’d out a lot of that file. Now if you were on the ball then you’ll notice that bob successfully ran a sudo command in order to cat the /etc/sudoers file, so we know sudo is working for bob, who’s been added to the sudo group.
But it is important to understand why bob is now able to sudo. Take a note of the last line in the cat of the file above. It basically says that “Anyone who’s part of the sudo group can sudo”. Now we know. If you still can’t sudo then you may need to edit this file. In which case use the visudo command, or create a conf file in /etc/sudoers.d/
3. Add accessory Utils & Programs
There’s a bunch of Linux programs that I use often but aren’t always installed “out the box” so I tend to install them at this point. Below I demonstrate installing them one at a time but you could put them all on one apt install line.
$ sudo apt update

## video audio encoder - vital for OBS, Audacity, Davinci Resolve  etc.
$ sudo apt install ffmpeg

## Display directory structure as a tree
$ sudo apt install tree

## Pull content from the web as a text file
$ sudo apt install curl

## Monitor the disk IO from the command line
$ sudo apt install iotop
## Run it as root
$ sudo iotop
4. Fix vim / vi Editor so Arrow Keys Work in Edit Mode
When using the command line text editor vi or it’s “Improved” relative vim there is a situation where, when in insert/edit mode you press the arrow keys to move the typing position, you get a new line with A B C or D characters. This is because the cursor/arrow key signal isn’t being mapped correctly. The fix is simple:
$ vi ~/.vimrc
set nocompatible
set number
Edit/create the file .vimrc in your home directory (~) and put the line “set nocompatible”. That’s it, next time you use vi or vim it will behave. The second line in that file is a personal choice: “set number” tells vi(m) to add a line number at the left hand side of the page.
5. Install Additional Fonts on Linux
Fonts are often overlooked by many but as someone who manages websites, has published a number of books, and who creates graphical artwork, then Fonts are a topic I’m interested in and care about.
FACT: Many of the fonts we take for granted are actually copyrighted. That’s why fonts you find on Windows are often missing from Linux. But because I publish my own books then I’m very careful to use royalty free and open source fonts to avoid potential copyright issues. So over the years I’ve gathered a collection of fonts which I store on an encrypted external hard drive.
When I build a new system, like this Debian 12 build, then one of the first things I do is install my font collection so my go to fonts are present when I open a book transcript or revisit a GIMP image file.
Let’s assume that I’ve copied all my fonts from the remote drive to my local Downloads directory, and that all my fonts are in a directory called “Marks-OS-Fonts”.
$ sudo cp -R ~/Downloads/Marks-OS-Fonts/ /usr/local/share/fonts/
$ sudo fc-cache -v
## If you want to review the fonts installed:
$ sudo fc-list
Install Microsoft TTF Fonts on Debian
If, and I stress “IF” you want to support Microsoft True Type Fonts like Arial, Georgia, Impact, Times New Roman etc. on your Linux system then there’s a community based package for maintaining that.
$ sudo apt update
$ sudo apt install ttf-mscorefonts-installer
## Rebuild the font cache. Note the install process would have placed the ms fonts
## in the right place on your linux system
$ sudo fc-cache -f -v
## If you want to review the fonts installed:
$ sudo fc-list
Manage Your Fonts via a GUI on Debian Linux
A good option for managing and viewing your fonts from the GUI is a program called “Font Manager”.

$ sudo apt update
$ sudo apt install font-manager
Fix a Problem with Fonts
$ font-manager
(font-manager:53890): [font-manager]-CRITICAL **: 14:30:41.896: Failed to get metadata for /usr/local/share/fonts/OpenSourceFonts/RobotoSerif_120pt_UltraCondensed-BoldItalic.ttf::0 - Failed to open file “/usr/local/share/fonts/OpenSourceFonts/RobotoSerif_120pt_UltraCondensed-BoldItalic.ttf”: Permission denied
In the above code example I executed the font-manager app from the command line so that I could see the output. On the GUI all the characters were just waffles (empty rectangles) indicating the fonts had failed to load. From the above warning you can see the issue is “Permission denied”. So the next step is to check the permissions for the font files and then fix as necessary.
/usr/local/share/fonts/OpenSourceFonts$ ls -al
total 343288
drwxr-sr-x 2 root staff   90112 Sep 25 14:28  .
drwxrwsr-x 3 root staff    4096 Sep 25 14:27  ..
-rwx------ 1 root staff   92208 Sep 25 14:27  AlumniSans-BlackItalic.ttf
-rwx------ 1 root staff   88516 Sep 25 14:27  AlumniSans-Black.ttf
-rwx------ 1 root staff   92380 Sep 25 14:27  AlumniSans-BoldItalic.ttf

$ sudo chmod 755 *.ttf
$ sudo chmod 755 *.otf
$ sudo chmod 755 *.woff
## Yes I could have just done *.*
6. Increase the Scroll Back Buffer for Konsole Terminal on Debian 12
The Konsole is the built in terminal in Debian 12 Plasma on Wayland and by default it has 1000 lines of buffer. You can change this to save more terminal history. This scroll back buffer is stored in a temporary file which is deleted once the konsole closes normally. It may remain if the konsole is killed or there is a system crash, power outage etc. So if you are particularly worried about security you may want to investigate using /tmp as the location for the scrollback temp file, which in theory is destroyed at end of session.
- Open Konsole
- Click on Settings
- Click on Manage Profiles…
- Click on + New… button
- Name it and check the “Default profile” check box below the name
- Click on the Scrolling icon on the left

- Set the Scrollback either to “Fixed size: but increase it to something like 50000 lines
or select Unlimited - Hit OK and then hit OK again on the remaining Configure – Konsole window
7. Change Folder Opening to Double Click in Dolphin
This is purely a matter of personal taste. But out the box a single click on a folder will open it in Dolphin file manager. But I’m used to double clicking, so I want to change it.

- In Dolphin, click on the mini menu far right (burger)
- Select Configure
- Select Configure Dolphin…
- And realise that the behaviour of single click to open a folder is not set in Dolphin (Hey sometimes we go down dead-ends to learn 😉 x )
The Correct Way to Change Click to Open Folder in Debian:
OK so here’s the correct way to change the default behaviour of what happens in Debian 12 Bookworm when you click on a folder or file and it opens. Follow these instructions if you want a single click in Dolphin or other file GUIs to simply select the file or folder. If you follow these steps then you’ll need to double click a file or folder to open it.
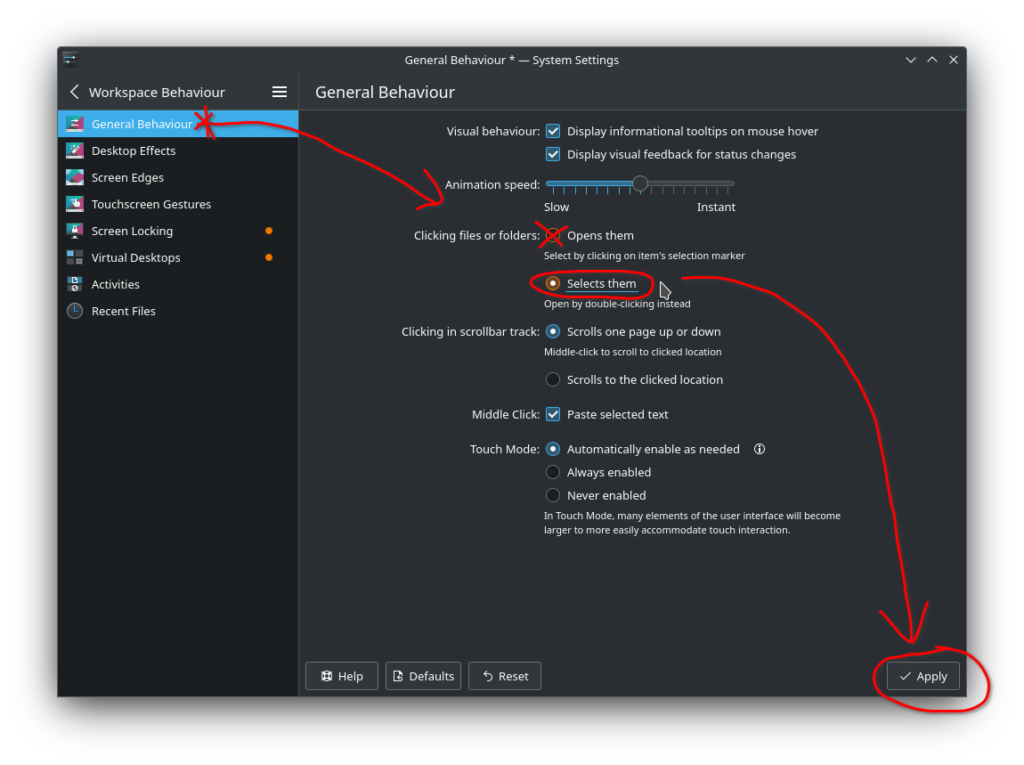
- Open System Settings
- Select Workspace Behaviour on the left hand side
- Select General Behaviour on the left hand side
- Change the radio button selection for “Clicking files or folders:” from opens to selects:
- ( ) Opens them
- (o) Selects them
- Hit the Apply button on the bottom right
8. Layout Changes to GIMP
This is just another personal preference but since I have a large 4k monitor and work in GIMP full-screen then I like to see all my tools laid out. So one thing I always do is go into GIMP and change this one setting:
- Open GIMP
- Edit > Preferences
- Interface > Toolbox and make the following changes:
- Uncheck [ ] Show GIMP logo (drag-and-drop target)
- Check [X] Show active brush, patterm & gradient
- Uncheck [ ] Use tool groups
- Click the OK button

When this is done then you’ll have all your GIMP tools on display and better use (I think) of the side bar real-estate.
